Nowadays, people take more time with their laptops rather than the desktop computers, because the laptops, on one side, are more convenient, on the other side, with the hardware upgrading, are gradually becoming more powerful tools than before, so that users can use them to do the same things as desktop computers do.
Then when it comes to screen recording on the laptop, since there are so many screen recorder software for laptop on the market, you may get a headache on how to choose the best one. Below in this post you will find something useful.
An All-in-one Laptop Screen Recording Program Is What You Need
Let's begin with how to judge and choose the one that suits you most?
● Firstly, check its supported systems and hardware requirements (if there is) to make sure it's compatible with your laptop.
● Firstly, check its supported systems and hardware requirements (if there is) to make sure it's compatible with your laptop.
● Secondly, check whether the software has features you need. For example,
- whether it supports recording a specific area
- if there’s an option to enable the system sound, microphone or webcam (for picture-in-picture effect)
- whether there's an annotation toolbar to draw or mark during screencasting
- do you need the task scheduler feature for auto future recording
- do you need to do easy edits with the recorder...
● The last thing is, of course, the complexity level of the software operation. Software with a complicated and unclean interface is not recommended for those newbies.
How to Screen Record on Windows Based Laptop from HP/Dell/Lenovo/Asus/Acer etc.
Here we set RecMaster – a simple yet versatile screen recorder – capturing laptop screen as a demonstration. You can work on any kind of recording out with it by following this guide.
Now please free download it on your laptop and finish the setup.
Step 1 – Plan Your Recording Type or Find the Recording Source
If you are going to make an instructive tutorial on a certain program (gameplay included), close all of the irrelevant tasks on your laptop and check the app’s performance in advance to ensure a smooth recording. If you plan to capture an online video, open the page and set a proper resolution to standby. If necessary, do test the system sound, microphone, and webcam in case some error occurs when using them during recording.

Step 2 – Choose Related Recording Mode on RecMaster
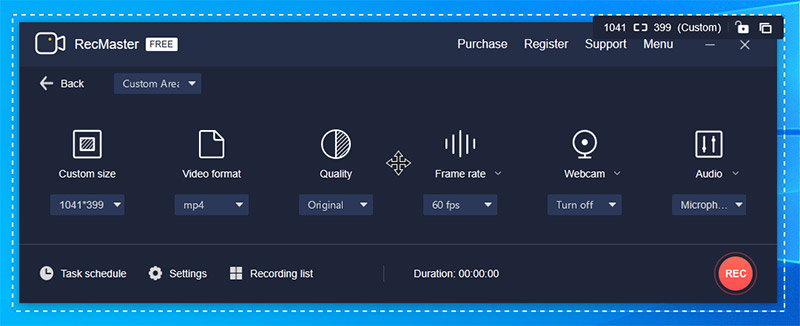
Open up RecMaster on your computer. There are multiple recording modes located on the main interface – “Game Mode” (for Windows laptop only), “Full Screen”, “Custom Area”, “Webcam” and “Audio Only”. You should select one recording mode according to your actual needs. Note that there’s no Game Mode for Mac version RecMaster currently, you can alternatively use full screen or custom area instead.
Each video recording mode enables you to edit output format, video quality, frame rate, as well as the mouse cursor and watermark effects. As to the display of webcam, whether to turn on or off the system audio and microphone, it totally depends on your requirement.
If you are going to make an instructive tutorial on a certain program (gameplay included), close all of the irrelevant tasks on your laptop and check the app’s performance in advance to ensure a smooth recording. If you plan to capture an online video, open the page and set a proper resolution to standby. If necessary, do test the system sound, microphone, and webcam in case some error occurs when using them during recording.
Step 2 – Choose Related Recording Mode on RecMaster
Open up RecMaster on your computer. There are multiple recording modes located on the main interface – “Game Mode” (for Windows laptop only), “Full Screen”, “Custom Area”, “Webcam” and “Audio Only”. You should select one recording mode according to your actual needs. Note that there’s no Game Mode for Mac version RecMaster currently, you can alternatively use full screen or custom area instead.
Each video recording mode enables you to edit output format, video quality, frame rate, as well as the mouse cursor and watermark effects. As to the display of webcam, whether to turn on or off the system audio and microphone, it totally depends on your requirement.
If your target recording content is a live streaming event, you are free to set the task scheduler to start the capture on time automatically. Thus you don’t have to wait in front of the laptop.
Step 3 – Start Recording and Do Annotation (Optional)
Tap the red circle REC button when you get ready to begin the recording. During the recording process, you can perform pause/start and end behaviors on the floating toolbar (enabled under Settings -> General -> Floating toolbar) or by using hotkeys. Below is the default hotkeys, which are changeable under Settings -> Hotkeys:
Start/Pause: Alt + 1 | End recording: Alt + 2 | Show main window: Alt + 3 | Hide/Show webcam: Alt +4
For those who need to annotate some content, the annotation tool on the floating toolbar is the facility to turn to.
Step 4 – End Recording
Click the red square on the floating toolbar or red round on the main window when you’ve finished the recording. Then a recording list window will pop up, delivering you the video information and allowing you to rename, play, edit, delete or upload the laptop screen recording to YouTube, Google Drive.
Click the red square on the floating toolbar or red round on the main window when you’ve finished the recording. Then a recording list window will pop up, delivering you the video information and allowing you to rename, play, edit, delete or upload the laptop screen recording to YouTube, Google Drive.
For video postproduction, RecMaster’s built-in editor only features cutting unwanted video parts off. If you need more video edits like adding effects, you are suggested get another editor expert. And many open source experts are worth a try such as Lightworks and VSDC Free Video Editor.
Wrapping Up on Recording Laptop Screen
Creating your own video channel is much easier than starting a personal site. And taking screen recording with an existing laptop or computer is the most convenient way to start your video journey, no extra cost at all. For most online courses, they are also the outcomes of a laptop plus a recorder program. For video collectors, recording is the only workaround when it comes to any un-downloadable or inconvertible video. Hopefully this guide is helpful for recording your laptop screen (with audio).
No comments:
Post a Comment