Live-streaming is going big in recent years! From entertainment to social media platforms, the giants have joined into the contest of live streaming one after another. Especially in this year, they are playing all their cards in the war of talents. For instance, in last month (November, 2019), Facebook and YouTube cut deal with a major pre-Twitch game streamer respectively. With over 1 and 2 million followers on Twitch severally, they two influential gamers – Jeremy “DisguisedToast” Wang and Jack “CouRage” Dunlop will certainly bring about a lot of benefits to Facebook and YouTube live channel in the future, among which traffic is the most visible one.
Online users love live streaming. Compared to regular non-live media formats like video-on-demand and vlogs, live streaming videos, by virtue of the born magic power, attract audiences to spend more time and interact more with it. However, since live streaming content only lives once, and most of them are unavailable to download or the full movie may be deleted according to author or platform’s willing, when you want keep it for further viewing or personal usage, you will have to learn how to record live stream video or audio by utilizing a live stream screen recorder.
Generally, there are two methods to capture live streaming video: one is using live stream screen recording software to capture directly on computer machine, and the other one is to transmit live video signal to third-party recording tool (like DVD recorder or VCR) off computer via a video-audio cable for recording. Here in this article, we will show you the former easier method in detail.

How to Record Live Stream Content on Windows PC or Mac (Laptop Included)?
The most efficient way to do live streaming capture is to find a slick live stream screen recorder, the one that can record, encode and output a high quality file at one go. RecMaster is just one of such seasoned screen recording software. It not only supports record living streaming from any online sites like YouTube Live, Facebook Live, Periscope (web), Mixer, Twitch, YouNow, ESPN live and Vimeo live, but also gives you a flexible control on recording size, format, quality and audio. Now leave out those theoretical words, let’s see how RecMaster works below.
Step 1 – Download and Install RecMaster
Download RecMaster for Windows or Mac below and install it on your computer, be it a desktop PC or a portable laptop. After finishing the installation, launch the program.


Download RecMaster for Windows or Mac below and install it on your computer, be it a desktop PC or a portable laptop. After finishing the installation, launch the program.
Step 2 – Set for Live Streaming Recording
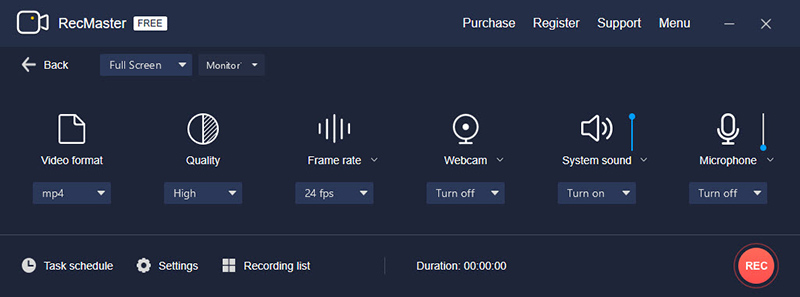
RecMaster has several recording modes.
For live video capture, you can choose Full Screen or Custom Area mode according to your watching habits (full screen or windowed). The only difference between them is Full Screen grabs the whole computer screen while Custom Area empowers you to select the specific region to record manually.
For live audio capture, choose Audio Only capture mode to save any online audios into MP3 or WAV easily.
When it comes to live streaming video capture, you are free to define output video format (to MP4/AVI/FLV), quality level (to Standard/High/Original), frame rate (to VFR/CFR, 20-60fps), adjust system sound volume, as well as whether or not to show your webcam or microphone sound. Some other settings like watermark or cursor effects are unnecessary if your goal is to do 1:1 capture.
[Task Schedule – A Recommended Feature You Shouldn’t Miss]
In case some sports/gaming/concert/awards living streaming events occur at an improper or say bad time, you’re suggested to take advantage of RecMaster’s Task schedule functionality. With it, you can create and enable any recording mission by setting a precise start and end time, choosing full screen or custom area recording mode, selecting what audio source to capture.
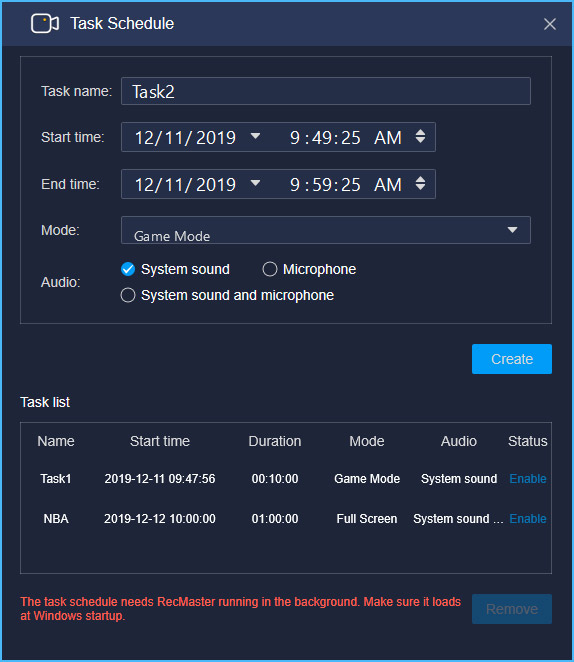
Do remember to run RecMaster in advance. If not, even you enable the live stream capture task, it won’t take go into operation. If you are not in front of computer near before the recording, you can auto-start the software by checking “Launch program at Windows startup” under Settings.
In case some sports/gaming/concert/awards living streaming events occur at an improper or say bad time, you’re suggested to take advantage of RecMaster’s Task schedule functionality. With it, you can create and enable any recording mission by setting a precise start and end time, choosing full screen or custom area recording mode, selecting what audio source to capture.
Do remember to run RecMaster in advance. If not, even you enable the live stream capture task, it won’t take go into operation. If you are not in front of computer near before the recording, you can auto-start the software by checking “Launch program at Windows startup” under Settings.
Step 3 – Start and End Recording
If you are recording the living streaming while watching before computer, tap the red button or use hotkeys (Alt+1/Alt+2) to start and end the screencasting when the broadcast begins and goes over. If you’re not here and use Task schedule, the recording will happen automatically. But make sure RecMaster recorder is running in the background and you’ve set the right capture time before your leaving.
If you are recording the living streaming while watching before computer, tap the red button or use hotkeys (Alt+1/Alt+2) to start and end the screencasting when the broadcast begins and goes over. If you’re not here and use Task schedule, the recording will happen automatically. But make sure RecMaster recorder is running in the background and you’ve set the right capture time before your leaving.
After recording, you can do easy edits with RecMaster or simply leave it on the hard drive for enjoy on someday in the future. Don’t share or transmit the content without the permission of copyright owners. If you are not sure about it, check through the platform’s terms of use and copyright law of your country.