Friday, December 31, 2021

YouTube 免费工具分类 & 最新推荐

四种常见 YouTube 下载工具分类

在进入到正式的下载器列表之前,让我们一起先来了解四种最为常见的YouTube下载工具,以及它们大概的工作流程,方便您可以选取到最适合自己的那一个。

1. 在线YouTube 下载服务

简易程度:★★★★★

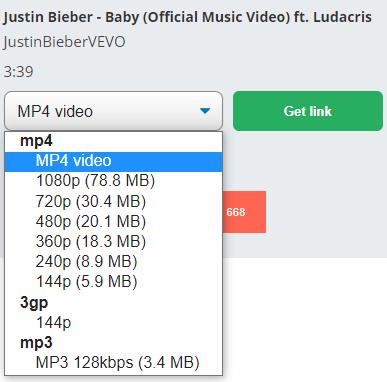
使用此种方式是最为简便省时的。无需登录,注册和工具下载安装,仅仅通过复制粘贴目标 YouTube 视频的链接地址到某个在线服务的链接对话框,便可以马上解析出可供下载的格式/format、视频分辨率/resolution、音频比特率/Kbps 和文件大小/size。通常,一般的在线视频或 YouTube 下载服务起码会提供 MP4 和 MP3 两种最主流的音视频格式(其它可能会碰到的格式还包括 WebM, FLV, 3GP,WAV 和 W4A),分辨率大小由原视频可用的视频参数决定,或许从144p 到 4K/2160p 都有,或许也只有其中的一部分。

在线YouTube下载服务

部分服务为了方便用户,还特别推出了一种快捷下载方法,不用复制粘贴链接,直接在 YouTube 视频链接按照规则加上既定字母或字母串便可直接跳转到下载页面,自带该视频链接。

2. 浏览器 YouTube 下载插件

简易程度:★★★☆☆

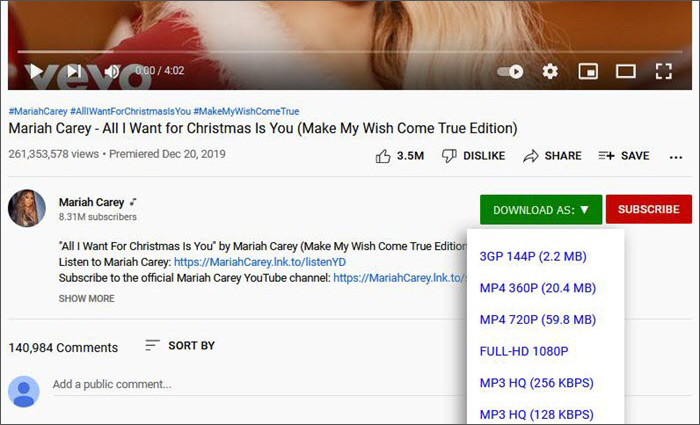
油管视频下载插件,顾名思义就是需要下载安装在浏览器扩展程序的小工具。您可以从 Chrome 或 FireFox 扩展商店找到合适的插件然后安装并让其运行,这样一来,不用复制粘贴链接地址、不用在浏览器左右切换窗口,在遇到遇到喜欢的视频的时候,便可一键在当下页面即点即下,也很方便。值得注意的是,有的插件是在浏览器地址栏进行操作,而有的是直接在 YouTube 播放界面出现相关按钮进行操作,如下图所示。
YouTube 下载插件示例

3. 常规 YouTube 下载器软件

简易程度:★★★☆☆

或许有人会好奇既然在线下载工具和插件那么方便好用,谁还会需要这种独立的软件,又要下载安装又要占设备内存?原因主要有三。

首先,在当下对在线视频下载工具日益严苛的网络市场环境,越来越多的服务提供商迫于谷歌、唱片公司等版权所有者的压力选择停止服务(如 savefrom.net 从2020年年初开始就停止了其美国),有的甚至关闭网站(如曾经的 YouTube-mp3.org),所以能长时间使用一个稳定的在线下载工具或插件也算是一件很走运的事情。

其次,在线工具和插件一般只支持单个视频下载,这对于想下载视频列表或者对多个视频同时下载的用户需求并不友好,需要反复进行操作才能把多个资源搬到本地。

最后,多数在线工具页面都会有弹窗广告,下载过程还可能会进入到第三方广告或者其他不知名平台,从安全的角度来说并不是很可靠,尤其是对于没有经验的新手用户,很容易误点从而下载一些“不必要”或者“有害”的东西。

4. 特殊命令行工具

简易程度:★☆☆☆☆

命令行工具对于普通用户来说可能比较陌生,它是一种没有图形化界面“包装”且基于文本进行相关操作的程序。有人形象地说它是30年前的系统界面,系统能做的事它都能根据指令来完成。在视频下载这个领域,最有知名度的命令行工具毫无疑问就是youtube-dll 开源命令行下载器。是的,因为所有操作需要用命令行进行,对于新手来说入门可能会有一点挑战,需要了解如何在不同系统打开窗口、需要熟悉各个操作的具体指令。

工具推荐

SaveFrom YouTube Video Downloader

Y2mate YouTube Downloader

4K Video Downloader

 Easy YouTube Video Downloader Express

Freemake Video Downloader

youtube-dll

WinX YouTube Downloader
ClipGrab

YTD Video Downloader

Monday, December 20, 2021

Why and How to Use Mobile Legends VPN?

 Some Benefits You can Obtain from A Mobile Legends VPN

In case many new gamers may have no idea on what is Mobile Legends VPN and why use it, hence multiple benefits to game with the VPN program are shared below for your reference.


1: Get around ISP bandwidth throttling and reduce/remove lag problem

Its a common phenomenon that the internet service provider(aka ISP) performs bandwidth throttling during the peak hours of a day to relieve the network pressure unless users pay for a more advanced service with no bandwidth limit. Surely this type of limit will affect the experience of web browsing, media streaming, file uploading/downloading, as well as playing online games, especially the latter three things.

When it comes to Mobile Legends gaming, you will typically encounter longer loading time, game lag issues, and higher pings. To improve or even avoid those annoying troubles and enjoy a latency-free or say fluent MLBB battle, as said above, you can upgrade your internet service level. If this is not what you want, leveraging a Mobile Legends VPN to escape any bandwidth limit as you wish. Yes, not only the limit from ISP, but also that from companies, schools, public-wifi owners and so similar are included.

2: Change Mobile Legends server location and attend any target regions clan

Registered gamers usually have many reasons to change server location of a game. According to an overall investigation, we found that the very first reason for MLBB server alter is to match up players from different nation group, be it the Asian hotspots like Indonesia, Philippines, Cambodia, Malaysia, Myanmar, Japan and Singapore or cross-continent regions like the US, Russian, Turkey and Brazil.

By default, the game server you will be involved is based on your current location. That said, you only have chance to fight with those in the same location. Although Mobile Legends developer Moonton (a game company from China and now is acquired by TikTok parent ByteDance in March 2021) permits users to change the the profile country, only for once, it has nothing to do with the server distribution. That makes the VPN for Mobile Legends: Bang Bang a necessity for experiencing other servers and players, or region-specific events or promotions. 

As for users outside the Mobile Legends supported regions, only by switching IP address to a MLBB-available one can they play the game normally. If not, the cold system notice pop-up like below will be always sent to you for a notice.

- We are solly that Mobile Legends: Bang Bang is not currently available in your country or region. 

3: Obtain Free Skins, Diamonds etc.

This is somewhat similar to the last benefit. As mentioned above still, a portion of ML fighters do server exchange just for joining into region-restricted events, and earning free skins and diamonds is actually the main purpose of it.

To realize this exciting free prizes obtaining goal, you have to look out for related events (such as Philippines Ca $ h Awaits Reward) every now and then and grasp the chance with the tickets and of course the help of VPN. Apparently, it becomes into a trick that more and more ML newcomers have mastered.

4: Ensure you a 100% secure payment

VPN is well-known for the capability to level up web privacy and cybersecurity. With a VPN run in the background, whenever you conduct a in-game purchase, it will encrypt your data and lock your shopping account, password, and other possible personal information so that no one else could collect, store, analyse or even steal it for profit usage. Protecting internet payment is super essential in everything, not merely in in-game purchase. Therefore, have a VPN nearby is suggested for anyone who will be involved in online shopping.

How to Fix ML Lag, Alter Server, Get Free Skin/Diamonds with MLBB VPN

Now lets get down to the steps on how to use a Mobile Legends VPN to make all of the listed benefits come true.

Step 1. Get a quality ML VPN

Since Mobile Legends are only available for iOS and Android portable devices, picking a slick one VPN thats workable on these platforms is a must-do. Here PandaVPN is a good bet to choose thanks to its cross-platform compatibility, simplicity,  accelerated (gaming) server, wide location support (170+ regions worldwide and the number is growing), good user base & reputation in SEA and other places in the world.

Step 2. Launch VPN and finish the log-in

To safeguard your behaviors better and guarantee a blazing-fast connection speed, you are recommended to pay for a pro plan because free trials may deliver you a relatively slower speed due to the massive use.

Step 3. Choose a mode and the expected server location to connect

Either Smart Mode or Global Mode is OK for gaming. If any purchase would be made, Global Mode (OpenVPN First) is suggested thanks to first-tire-safe OpenVPN protocol.  


Then select the server location youd like to put yourself in amid Mobile Legends gaming, from the server list. PandaVPN offers one Smart Connect for no-brain connection and 13 server groups for you to choose by continents, countries, or other actions like gaming, streaming and torrenting.

Navigate to the right group and tick the one with less latency value. Alternatively, you can straightforwardly search and pick. All hot battlefields positions can be found here, such as Indonesia, Philippines, Malaysia, India, Japan, Myanmar, Singapore, Bangladesh, Brazil and United States.

No need to press the button again, once youve chosen the target server, it will automatically connect to it immediately.

Settng tips attention: PandaVPN for iOS/Android offer split tunneling feature to enable or disable VPN in certain app(s). If you are willing to customize it, e.g only enabling Mobile Legends game to use VPN, do turn on this feature under settings and check Enable VPN for selected Apps ->Mobile Legends: Bang Bang.

Step 4. Return and open Mobile Legends: Bang Bang for what you want to do with VPN

When you enter into Mobile Legends, your location is refreshed to the one you wish. At this time, if you are in a brand new area, you are free to create new account in this area, play with local ML-phile, enjoy the power of region-limited heroes, attend this areas special event for free skins/diamonds. If you didnt change the country but simply use another IP address here to get rid of bandwidth throttling, speed up the game, or buy something in 100% secure way, the successful connections make everything happen. 

Source: Best Mobile Legends VPN: Why You Need It for Better Gaming Experience

Tuesday, November 16, 2021

How to Unblock Netflix & Watch Netflix from Anywhere You Like

 For various reasons, you may be unable to access Netflix to watch its hot blockbuster movies, animations, TV shows, documentaries, etc. After finishing this post, you will know why you are blocked by Netflix and how to do Netflix unblock easily.

Netflix, although many claim that it has gone down from its peak, is still the undisputedly #1 streaming platform worldwide thanks to its stunning original content, vast streaming library, first-tier user experience and cover-all country expansion strategy. According to the most recent official report, Netflix finished its first quarter of 2021 with 208 million paid memberships, far more than that coming from other rivals like Prime Video, Disney +, HBO, and Hulu.

Netflix is now available in 190+ countries and various platforms. But it blocks you when…

Under certain circumstances, you are not allowed to visit Netflix web page or access to the target library you’d like to. Let’s see all of the possible situations here, along with the potential reason you may know or not.

1. Your home country is not supported by Netflix currently.

Netflix hasn’t brought about its streaming service to a few countries yet and they are typically China, Crimea, North Korea and Syria. That said, if your home country is either of those Netflix-unsupported countries or regions, with the local IP address, you are given no chance to visit Netflix official site and do further purchases at all unless you gain the benefit of a VPN to change IP location.

2. Your country does support Netflix. But the Local Area Network / LAN has put Netflix into the blacklist.

Many countries have strict online censorship – banning porn, political media, social media, google and so forth sites with their own national firewall tech. Similarly, any local network owner or administrator can self-define the internet access permission. For instance, the employer can block certain websites from employees in the workplace to ensure a positive working atmosphere, the parents can forbid their kids to visit inappropriate content, the schools, universities, libraries, and some other public places can prohibit the WiFi connector from using bandwidth hogs.

Netflix, once being added into the black list of local networks, even if you are in a Netflix available location, you are kept out of Netflix’s gate. To bypass the restriction, you simply need a proxy or VPN service. (See proxy vs VPN)

3. You’ve moved to a country or region that doesn’


t embrace Netflix.

Still set an example here. If one pays for the US Netflix but goes to say China, where Netflix is not introduced yet, then you will by default be unable to enjoy the streaming service as before. To watch Netflix as you are still at home, you are suggested to hide the real IP and leverage a new one in your home country. Regardless of the state or city, any IP within the country is qualified to see the same rich library.

4. Even when you come into a Netflix-friendly country, the home country’s library will block you by default.

Since Netflix pays for the license of streaming content differently by country and region, every country has its own licensed streaming resources and still the self-produced content. In other words, if you go abroad for work, study or travel, you will lose the opportunity to spend time with Netflix with your home country’s library.

At present, Netflix has over 13,000 titles worldwide and the United States/US has the largest Netflix library, with over 5800 titles in total. Two things can be reached out: 1). No matter where you are, you cannot enjoy all of the Netflix titles at the same time. 2). If you leave the US, wherever you go, say UK, French, Canada and Germany, there are fewer Netflix titles.

5. You are using a proxy or VPN while it’s detected and disabled by Netflix

Netflix has put increasing efforts on disabling proxy, VPN service, or other tools to re-route local traffic to another place to trick Netflix mechanism. Simply put, if an IP address (from VPN or proxy Netflix unblocker) delivers many accesses, or the IP address mismatches DNS settings, in all probability, Netflix will recognize that and block the IP or even the series of Ips generated by the same host. Usually, you will be informed with error messages like “You seem to be using an unblocker or proxy” and “BLOCKED”.

Note: Account sharing is the upcoming crackdown target of Netflix team because according to the related report in 2021, about 40% of Netflix subscribers conduct password-sharing, causing a large number of economic losses especially during the COVID-19 pandemic. Netflix now just requires verification to allow account login in other places simultaneously. However, it’s hard to tell the anti-password-sharing project will carry out more rigorous policy to prevent such behavior in the near future,

How to Unblock Netflix to Watch Your Favorite Streaming Content

The best way to have Netflix unblocked is to still take advantage of the VPN program, surely a high-quality one. Despite Netflix has an anti-VPN program, like what we’ve mentioned above, it only works with bad-quality VPN services with insufficient servers and IP addresses. If the virtual private network provider prepares plentiful enough servers and IPs to distribute to the growing number of users, there’s no problem at all.

Here PandaVPN is recommended to help you get around geo limitation of Netflix, no matter you live in a Netflix-unavailable country or in a Netflix-available place but want to access any other specific region’s exclusive Netflix contents.

PandaVPN is a cross-platform and slick (Netflix) VPN provider that everyone could use to unblock Netflix on computer and mobile, entering into massive content globally with ease. Now let’s get together to see how PandaVPN works for Netflix.

Step 1. Get PandaVPN and Install It on Your Device

Navigate to PandaVPN's download page to get the right version according to your smart machine. Now PandaVPN is compatible well with Windows, macOS, iOS, Android, Linux, and Android TV.

Step 2. Connect to An Expected Netflix Streaming Server

After setting PandaVPN up on your device, launch it to have it connect to any Netflix acceptable server in clicks. PandaVPN sorts its rich lines into categories by both locations and purposes, such as Recommended, Streaming, United States, Europe, China, Japan & Korean, Middle East & Africa, BitTorrent, and Game Proxy.

From either location or streaming option, as long as the word “Netflix” is included in the line description right below the line name, you can pick it as your line to connect. So just make the decision where you are willing to be and one-click or -tap to make it happen immediately.

Step 3. Access Netflix and Start Your Free Netflix Journey

Depending on your device, you can visit Netflix.com from the browser or launch its desktop App in the chosen country’s IP address. Sign your account in (if you don’t have one, do a purchase beforehand) and then navigate to your preferred catalog to initiate the full-filled Netflix marathon at will. If you want to watch Netflix from any other country, just switch the server line to the one in that country in PandaVPN, please.


By following this guide, you can easily unblock Netflix on a school and work computer/laptop, on your personal PC or mobiles with a public Netflix-restricted WiFi, as well as in any country all over the world. If your goal is to unblock and watch Netflix on a Chromebook, Roku, gaming console and so on niche smart devices, if it’s not the setting problem, you should seek help from a VPN compatible with them.

Will My Netflix VPN Be Detected and Lose Ability to Work on It?

No VPN provider can promise you its service is and will be 100% workable on Netflix and many more streaming services alike. That’s because the real server configuration, number, usage condition and most importantly the VPN-blocking tech will affect the result jointly.

To avoid the VPN doesn’t work with Netflix or is easily spotted by Netflix, you’re strongly suggested to turn to a top-ranked Netflix VPN with a broad range of servers, stable & fast connection, and of course a good reputation. PandaVPN is one of those fitting the bill. By supporting 78 countries, 130 cities and 153 locations on the earth, it allows you – the movie/TV connoisseur - to unblock any catalogue and title freely.

Is It Illegal To Use a VPN for Netflix?

Not illegal exactly. VPN is usually adopted as a tech solution to obtain online privacy and gain better internet security, and IP masking and alter is just the approach but not the objective. When you make use of its IP hiding feature to get rid of region-locked policy from Netflix, you just go against its terms of service and the platform can technically end your access to its library once you get grasped.

Set aside the Netflix platform, if your country, e.g China and Russia, has banned the usage of VPN or certain illegal VPNs, you’d better think twice before using VPN, not merely to unblock Netflix.


Source: How to Unblock Netflix in 3 Steps
Wednesday, July 22, 2020

How to judge the security of a screen recorder?

How to judge the security of a screen recorder?

Normally, most of the screen recorders, especially those top-ranked, are reliable to use on your mobile or computer. However, to help you ensure the safety of each screen recorder by yourself, here several tips and tricks are shared to help you obtain a totally safe screen recorder and pleasant screen recording experience.
1. Download or use the screen recorder from secure website.
Official site is the recommended place to get a screen recorder’s installer. While if the site is marked by browser as an insecure one in its address bar, don’t download or use anything from this site in case you are infected with unknown threatening stuff.
2. Mind whether there’s any bundled software when installing any desktop screen recorder.
Not all bundled tools are harmful to PC, because some may be the outcome of brand cooperation. However, as the “most popular” spreading way of malicious/ad/spy software, you still need to put more focuses on that. Uncheck the installation of such attached app or take some time to search to know it exactly.
3. Pay attention to if there’s any security prompt from anti-virus program.
Anyway, you pick and set the screen recorder up on your desktop. In general, your antivirus will scan and give you security identification on the installing package and process. If there’s nothing special, congratulation, you can start up any capture at will. While if there’s red warning, you are suggested to stop and quite this utility.
4. Keep an eye on the popup ads.
Either from the online site or desktop interface, automatic popup ads are annoying. This kinds of sudden appearance may also have you infected with unknown virus if you click or initiate other thing with them. So thinks twice before doing so.
5. Cloud or local storage, broadly speaking, owns the similar security level.
Many take cloud storage solution a less safe way to hold crucial business recording for its shared server and invisibility, however, with the reliable cloud service, you can save the recorded file as safely as keeping it to local server. Since no one is typically superior to the other one, simply choose the more convenient and proper one according to your file type and budget.

Some Safe Screen Recorders for Windows and Mac

RecMaster
OBS Studio
Bandicam
Movavi Screen Recorder
screencast-o-matic
Screencastify
Loom
filmora scrn

Tuesday, June 16, 2020

How to Record Video Tutorial on Computer [Easiest Way]

Keeping hearing an idea that video is the future of content marketing. Who recognizes the age of video has already arrived! Video is not only a smash hit among business and work, but also enjoyed greatly by teachers, students, (YouTube) vloggers and general public for personal usage. If you happen to be one of them and want to record video tutorial to showcase product demo, impart knowledge, instruct a how-to, or share something new, let’s get together to walk through the whole process below.

How to Make Tutorial Video with Screen Recorder and Editor

Producing video tutorial is not such difficult, because nowadays there are a number of handy and slick screen recorder and editor programs that could help you achieve the goal perfectly. Of course, pure screen capture software with no editing features is able to create high-quality screencast as well. The only shortcoming is that when you want to do some basic edits, you have to search for and download another video editor to continue the work. That’s to say, screen recorder with internal video editor is superior to that who doesn’t bundle editor.
Without further ado, now, please take a look at how RecMaster – the easiest screen recorder for tutorial – makes tutorial recording on Windows 10 PC.

1. Free download and install RecMaster

RecMaster now supports both Windows and Mac systems. If your machine is Windows XP, 7, 8 or 10 based one, or is running any among macOS 10.11-10.15 versions, obtain the related installing file below and set it up on your computer.

2. Get the recording content ready

This is an essential step, because as a rule, most experienced video producers make a plan and write down detailed script before the real capture. The purpose of these behaviors is to make the final tutorial well-constructed and eye-catching for viewers from start to end. If you care your audiences, take time to do it.
● Tips on planning
Great content is half the success. So you are suggested to investigate, address the specific customer and decide what tutorial theme or main idea to record. If possible, communicate with potential viewers to explore their expectations, adopt & arrange them, and ensure your upcoming recording, at least the main part, is to their tastes.
You can write a brief outline covering tutorial title, main parts, rough duration of each part and so on. Aiming to help you always get the point during recording, plan staff is worth a try. Drawing blackboard is also an available way to visualize recording beforehand.
● Tips on script
To captive people and make them believe in your words, telling the “story” naturally, funny and keeping it as simple as possible. But don’t be a statement machine. If the on-screen movements could speak for themselves well, why not nourish the visual activity with more educational or convictive narration.
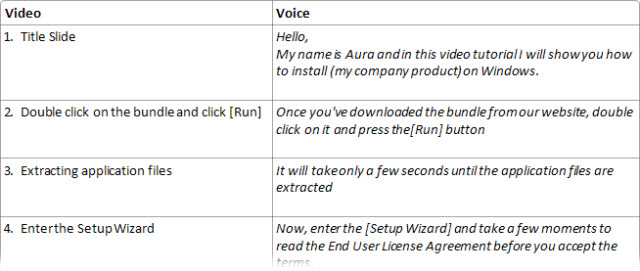
Script is regarded as the most important portion of plan, which contributes to a more effective video tutorial. Two- or more-column video script showing video scenes, audio, annotation and more is an excellent choice. You can find many practical script templates online of training tutorial, video lesson, demo or other types. Below is an example picked online.
Script template for video tutorial
● Practice really matters
Practice makes perfect. An impressive and user-friendly video must be super smooth on both screen activity and external narration, with no lag capture, no “eh.. eh..” mur-mur or embarassing standstill to get the audience sidetracked. Therefore, be patience to practice until you level yourself up at an expected flow. It’ll be better if you can find someone to listen to your practice and are not niggard to give you unbiased advice.

3. Start the Tutorial Recording

After having all things prepared, it’s your show time!
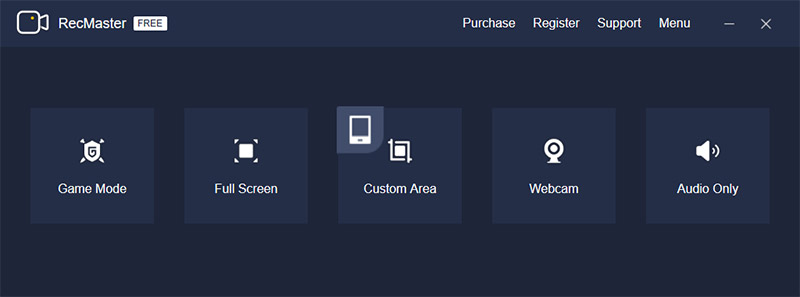
Open up RecMaster on desktop and choose a proper recording mode as necessary. In most cases, Full Screen is the top choice for entire display capture. Custom Area is also picked by many to avoid leakage of any private things on PC. For Windows users, Game Mode is also a good mode for DirectX game capture.
Free RecMaster
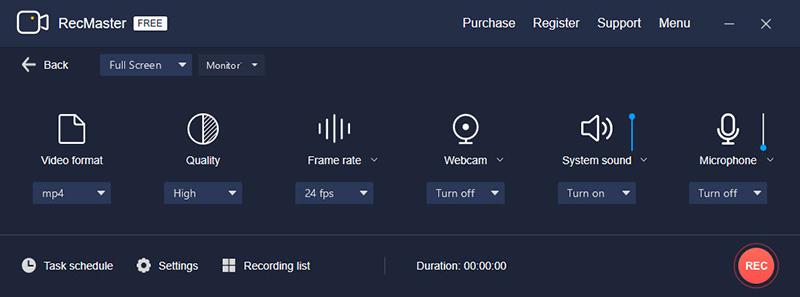
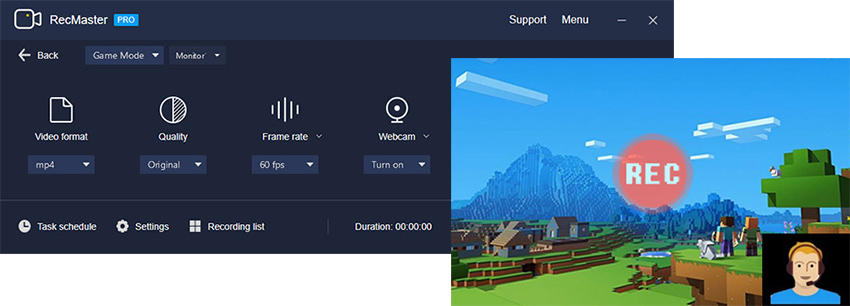
RecMaster, as one of the best and the easiest screen recorder for computer, is equipped with many key features. Here after defining video format (MP4 or so), quality level (original high quality at most), frame rate (up to 60fps), webcam and audio source on the secondary window, and maybe also mouse cursor effect and watermark on Settings panel, you can begin the capture immediately by pressing the REC button or typing Alt + 1 hotkeys.
Full screen recording settings
Please note: In order to gain a lag-free video tutorial, you’d better end all of the unnecessary tasks on desktop.
Also, the audio source includes system sound and microphone. The former one refers to the sound coming from sound card and the latter option means voice from any external (plugged) mic. Set an example here: if you plan to record video tutorial with real-time background music (played on PC) and narration (spoken via mic), turn the two audio options on at the same time.

4. Add Voice over, Webcam, Annotation etc.

As long as you’ve turned the microphone on, go on your voice with the ready-made script on what’s happening on the screen. During the recording process, you are free to pause & resume (with Alt + 1 hotkeys) for repeat or annotation, show or hide webcam for picture-in-picture effect (with Alt + 4), and show main window (with Alt + 3) for more settings. And all of those key combinations are changeable under Settings.
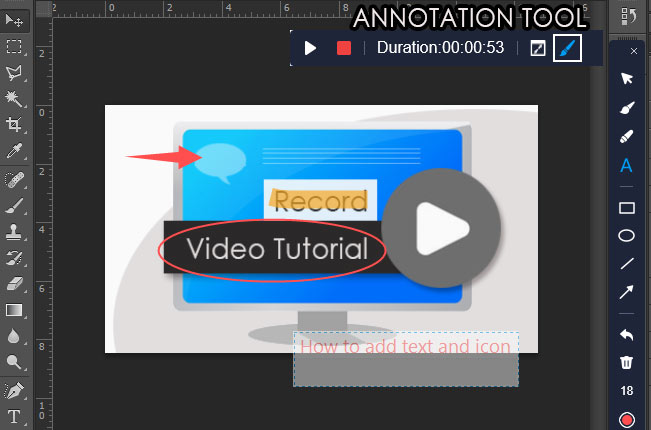
In some cases, you must need the annotation tool to highlight or explain something. Do access the floating bar panel and click the pen icon to pop it up, then take the advantage of a dozen of objects such as brush, rectangle, circle, line, arrow  to mark, text to note, pen highlight etc. You can tweak the thickness and color of shapes, font size of text as you like.
Annotation tool of RecMaster
NOTE: Only when the “Hide panel when recording” option under Settings -> General -> Floating toolbar is unchecked will you see the floating bar during tutorial recording.

5. Stop It

When you have finished recording video tutorial, end it by clicking Red button or type Alt + 2. After that, the tutorial clip will be listed in a recording list with default date-&-time-formated name, duration, file size and more.

6. Edit and Upload

In case there are mistakes or unwanted segments, RecMaster is embedded with an editor to help you cut the extra parts off by cutting & merging.
cut video
Now, you can share this finished tutorial video to your YouTube channel by simply clicking the UPLOAD icon and pick YouTube as the target social site. Also, you can back it up to Google Drive here.
upload to YouTube from recording list
Other feature you may need: Scheduled recording, Webcam recording, Audio only recording

Monday, May 25, 2020

4 Tools to Record Hulu (Live) TV

– Live TV streaming only lives for once, and for some contents you want to view more than one time or you don’t have time to sit in front of the monitor to watch, you need to do recording.
– Sometimes when you go for a travel or holiday, you want to pass time with Hulu TVs on the airplane or other wireless places, and at this time, you need to record them in advance for offline playback.
– Also for those non-live video-on-demand videos, once your subscription goes to an end, you can’t access and play those you haven’t finished any more.
So here we give several tools to record Hulu Live TV or  general subscribed  video-on-demand video at will.
1. Hulu’s Cloud DVR
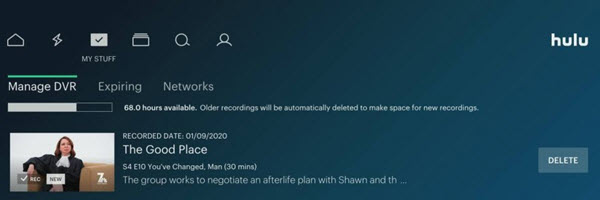
Hulu gives its Live TV subscribers a Cloud DVR service to record any TV shows, movies, and other live events for playback. So you don’t have to worry about missing what you love for various reasons, just add the right name(s) to “My Stuff” to record. But the default free storage is only 50-hour. Once it reaches the full capacity, new recording will replace the older according to the time order.
Cloud DVR of Hulu app
You can choose to upgrade the storage to 200 hours by paying a $9.99 montly fee for Enhanced Cloud DVR Add-on, with which you can also enjoy extra ability to fast forward through recording ads.
2. Third-party DVR Streaming Recorder like Audials
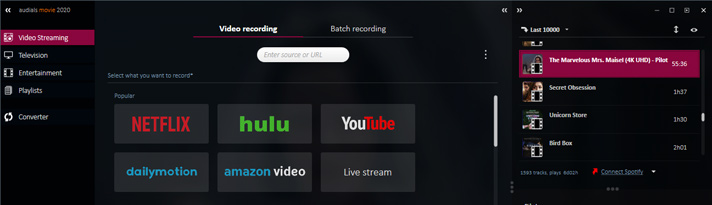
You can also hire dedicated streaming DRM remover and recorder software like that from Audials, PlayOn etc. This kind of streaming recorder is able to access & remove DRM and record any movies, TVs and matches so that you can open them at will regardless of the playback devices.
Audials record hulu streaming
3. VCR or DVD Recorder
VCR and DVD recorders seem a little bit old-fashioned, but they work quite well on Hulu content recording. Once your set-box DVR keeps shows locally, you can output them from DVR and input them into VCR/DVD machine with related cable.
4. Screen Recorder like RecMaster plus DRM Crack Tool
Widevine DRM is the copy protection tech that Hulu as well as many other streaming giants adopt in their subscribed media. As one of the less secure DRM implement, L3 carries low-quality video and audio data and is not hard to decrypt. In the past 2019, a security researcher has cracked it successfully. After decrypting Hulu video with third-party tool like WidevineCDM, you can watch and record any Hulu-locked content with RecMaster screen recorder for unrestricted playback in clicks. For ad-included videos, you’d better pause and resume the recording to skip the ad forward. And for upcoming Live show, you can create and enable a scheduled task to auto-start the capture at time.
record Hulu with screen recorder

Friday, May 15, 2020

How to Capture Screen Video with Nvidia Share/Shadowplay

Nvidia has its own screen recording tool to help its graphics card owner capture game video effectively, and that’s exactly the Nvidia Share, previously known as ShadowPlay. It's a bundled utility of Geforce Experience, a companion application for Nvidia GPU users to update driver, improve gaming performance and share screen. Specifically, the Nvidia Share has 2 core features regarding screencasting: Instant Replay and Record.


What’s the difference between instant replay and record? 

–  Instant Replay automatically records gameplay in the background, and whenever you have some moments to save like killstream, you should  press hotkey to save the last 5-min (adjustable) game video locally. If you don't save it, the cache recording will be discarded and replaced by later data.
–  Record of Nvidia Share is a manually recording mode. Only when you make it happen, it starts the real-time recording and hardware-accelerated encoding. You also need to give it to an end manually. 

Nvidia Video Capture Supported PC, Games, Settings..

● System requirement of Geforce Experience Share: Windows 7/8/10 with Nvidia GTX 600 series card or higher (More details)
● Geforce Experience and Share supported games: DirectX 9/10/11-based games. Note that OpenGL games are only supported at windowed mode. (Supported games)
● Video Formats: H.264 MP4
● Instant Replay length: 0.25 – 20 minutes
● Manual recording length:
For Windows 7, it’s limited to 4GB (about 20 minutes depending on quality settings).
For Windows 8 or later, there’s no time limit as long as the free disk space is enough.
● Capture quality: Low, Medium, and High. Customization is also available.
● Resolution: up to 1440p HD
● Frame rate: up to 60fps
● Bit rate: 10 – 50 Mbps

How to Use Nvidia Screen Recorder to Capture Screen Video

This is how Nvidia screen recorder works on your computer:
Step 1. Enable Nvidia Share
Surely, the premise of a normal Nvidia recorder usage is that its Share feature is enabled. Check and enable it under Settings -> General -> Share.
Step 2. Choose the Recording Mode
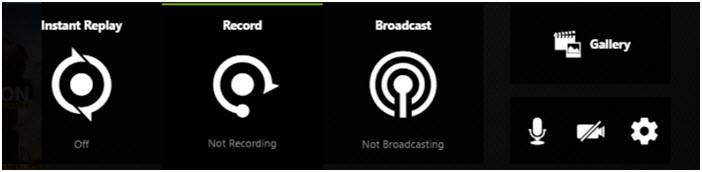
As mentioned above, Share has two capture modes – Instant Replay and manual Record. You decide which is more suitable for you according to your actual requirement.
Two Modes of Nvidia share
Step 3 – Set for Recording
The settings may include that listed Nvidia Video Capture Settings in the previous part like video quality, length, resolution, fps and bitrate, and some others like audio source/volume, recording saving path, HUD layout contents (camera, FPS conter etc.) and position.
Another thing you should to know is that Nvidia Share supports both windowed and full desktop capture. To conduct an entire desk recording, you should open up Privacy control panel under Settings and toggle the Desktop capture option to the green-background “On” status.
Step 4 – Start and End Recording
Everything prepared well, run your PC game and go ahead the capture in its own way. Below are some hotkey concerning Nvidia recording:
Alt+Shift+F10: Turn on or off the Instant Replay
Alt + F10: Save the last x minutes recorded when Instant Replay is on.
Alt + F9: Toggle manual recording on or off. Save the manual recorded video.
After the recording, you can directly upload the clip onto social media platforms on the overlay.

Limits of Nvidia Screen Recorder

☛ GeForce Experience is born with advantages on game recording thanks to the hardware accelerated processing and less performance penalty (about 5-10%). However, if your GeForce video card of desktop or notebook is not competent for that, say GTX 500 series or lower, you will lose the chance to enjoy GeForce Experience screen recorder.
☛ Then since GeForce Experience is a multifunctional program which is designed for updating graphics driver, optimizing gaming performance, as well as screen capturing and live broadcasting, it puts more efforts on feature balance and basic game capture, missing some settings or functions that many common dedicated screen recorder will embed, for instance, non-game recording, recording formats, edit suites, and scheduled recording.
☛ At last, as we’ve shown above, Windows 7 users can simply document around 20-min game fight and couldn’t benefit from the unlimited manual recording like Windows 8 and 10 hosts.

How to Record Gameplay or Other Screen Content at will?

If you are up a creek of either of these circumstances, you will have to turn to some best Nvidia screen recorder alternative like RecMaster. RecMaster is an easy yet feature-laden screen recording software program. With it, you can capture any DirectX game or non-game video with audio on desktop at your perfered size, format and quality. Multiple-monitor capture, automatic capture, webcam overlay, voice narration, in-game annotating, defined watermark, bundled video editor and one-click sharing are all here to ensure a happy customized journey. Now let’s take a look at how it works on computer. You are suggested to free download it here and set it up on your machine.

How to Screen Record Game or Non-game Video with RecMaster on PC/Mac

Step 1 – Prepare Content and Choose a Recording Mode
Depending on the recording content, you should select one recording mode once you launch RecMaster.
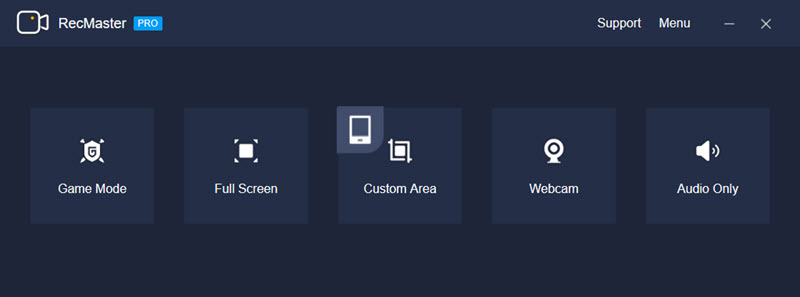
Main UI of RecMaster
Game Mode is a Windows-only feature that’s especially developed for PC gamer. Something like Nvidia’s manual recording, it helps you keep the whole gameplay walkthrough or some crucial segments as 1080p HD/4K@60FPS MP4.
Full Screen is to grab the whole display video.
Custom Area is used for any certain region recording, maybe an app, a browser tab, or something else.
Webcam simply records and outputs camera video of integrated or external front cam.
Audio Only serves as an audio recorder for maintaining any online ratio, music, podcast and so on.
In most cases, Game Mode is the go-to option for game capture, and Full Screen & Custom Area for general non-game recording. Nevertheless, if your PC game doesn’t cooperate with Game Mode, switching recording mode is a reliable workaround.
Step 2 – Do Settings
For video capture, you can adjust video format (MP4/AVI/FLV), define a quality level and frame rate value. Also, you can mix webcam overlay, system sound and voiceover from mic. If you want to achieve more watermark and cursor effects, go to Settings panel to do so,
Record game with RecMaster
For auto-capture, please open up Schedule task control, fix the start & end time, and then don’t forget to enable the task.
Step 3 – Record and Stop
Pressing the red buttons to start and stop the recording. During the process, the mini floating bar gives you access to annotation too. After the recording, the recording list offers entrances to editor and social share.
RecMaster Hotkeys:
Start/Pause recording: Alt+1
End recording: Alt+2
Show main window: Alt+3
Hide/Show webcam: Alt+4